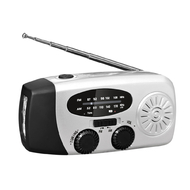
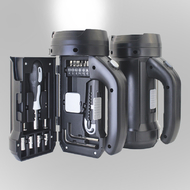
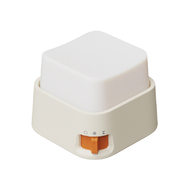
Emergency Solar Hand Crank Radio | Multifunction Disaster Flashlight Power Bank
1.3 Power Charging Modes, Never Run Out of Power During Blackouts & Disasters
Built-in 2000mAh large capacity rechargeable battery with triple charging solutions for emergency use:
•Solar Panel Charging: The top solar panel absorbs natural sunlight to recharge the unit outdoors.
•Hand Crank Dynamo: Generate power manually by rotating the crank when no light or power supply is available, ideal for earthquakes, typhoons, power outages and wilderness emergencies.
•Type-C Fast Input: Charge quickly with universal phone Type-C cables for daily full power preparation.
2.Dual LED Light Modes, Spotlight & Reading Lamp Combined
Dual-layer LED lamp assembly with one-button light switch:
•1W High Power Spotlight: Concentrated long-distance beam for night walking and rescue search.
•4×0.5W Soft Reading LEDs: Wide diffused gentle light for tent reading and close-range maintenance.
Independent light control button for easy operation.
3.AM/FM Dual Band Radio with Telescopic Antenna
Supports FM & AM broadcast reception. Extendable 5-section metal antenna boosts signal stability. Large tuning knob with clear frequency dial for easy station search of weather alerts, disaster news and real-time reports. Built-in heavy bass speaker delivers crisp audio, plus a 3.5mm headphone jack for private listening without disturbing others.
4.Loud SOS Alarm & Battery Level Indicator for Survival Rescue
Dedicated SOS emergency button emits high-decibel distress siren to help rescuers locate you when stranded. Clear battery indicator lights display remaining power to remind you to recharge in advance.
5.USB Power Bank Output for Emergency Phone Charging
Standard USB output port works as a backup power bank to charge cell phones, Bluetooth earbuds and small electronics, keeping communication available during disasters.
6.Multi-region Versions & Multiple Colors, Bulk Wholesale Available
Three frequency versions for China, Europe and Japan markets. Available in red, yellow, white, green, blue, black and orange casings. Perfect for disaster supply stores, outdoor camping retailers, corporate safety gifts and cross-border e-commerce sales.
Cleaning an oven can be a time-consuming and unpleasant task, but using a lemon is an all-natural and effective way to remove grime and grease buildup without the use of harsh chemicals. This article will include a step-by-step guide on how to clean an oven with a lemon and some tips & tricks to wash that grime away.
Introduction
Oven cleaning is important for maintaining an oven's hygiene, cooking performance, and longevity. A dirty oven can harbor bacteria, affect the quality of cooked food, and reduce the efficiency of the appliance. Regular cleaning helps to prevent the buildup of grease, grime, and other substances that can cause health and safety concerns. It also ensures that the oven operates at its optimal level, extending its lifespan and reducing the need for costly repairs. By cleaning your oven regularly, you can help maintain its cleanliness, efficiency, and reliability.
Materials Needed
To first clean your own you will need some key materials.
One lemon
A bowl
A cutting board
A knife
A soft cloth or sponge
Baking soda
A soft scrub brush
A damp cloth
Step by Step Guide
Step 1: Cut the lemon in half
Begin by cutting the lemon in half and squeezing the juice into a bowl. To make the mixture less acidic, you can add a small amount of water to the bowl.
Step 2: Apply the lemon mixture
Take a soft cloth or sponge and dip it into the lemon mixture. Wipe down the interior of the oven, focusing on areas that are particularly dirty or greasy. Let the mixture sit for 5-10 minutes. This will allow the lemon to loosen and dissolve the grime and grease.
Step 3: Sprinkle baking soda
Once the lemon mixture has sat for a few minutes, sprinkle baking soda over the areas that still have grime and grease. This will help to lift the dirt and make it easier to clean.
Step 4: Scrub the oven
Using a soft scrub brush, gently scrub the interior of the oven, focusing on areas with baking soda. If necessary, add a little more lemon mixture to help remove the dirt. Be gentle when scrubbing to avoid scratching the surface.
Step 5: Wipe down the oven
Once you have scrubbed the oven, use a damp cloth to wipe down the interior, removing any remaining dirt and baking soda. Make sure to rinse the cloth frequently to avoid spreading the dirt around.
Step 6: Repeat the process
If the oven is still dirty, repeat the process as needed until it is clean.
Tips and Tricks
If you have tough, baked-on grease or grime, you can let the lemon mixture sit overnight.
To get into hard-to-reach areas, you can use a toothbrush or an old, clean paintbrush to scrub the grime.
For extra cleaning power, you can add some salt to the lemon mixture or sprinkle salt over the baking soda.
Final Thoughts
Using a lemon to clean your oven is a natural, safe, and effective alternative to harsh chemicals. The acidic properties of the lemon help to dissolve grime and grease, while the baking soda acts as a mild abrasive to lift dirt. With a little elbow grease, you can easily clean your oven and get it looking like new. However, if you have a self-cleaning oven, be sure to check the manufacturer's instructions before using lemon, as some models may not be safe for use with acidic cleaners.
FAQ
Repeat the cleaning process again with a fresh lemon to remove all the dirt or grime. Also you can add salt to the lemon mixture to make it stronger.
It's best to use lemon with baking soda as baking soda can lift the dirt and make it easier to clean.
Allow it to sit for 5-10 minutes to let the lemon loosen the grime.